An email is an efficient tool for driving sales and marketing in general. The task of sending emails manually as well as sending bulk emails is easy but it becomes tedious when you have to send emails to hundreds or even thousands of recipients.
And how do you know if recipients read emails and it’s time to send the next email? Surely it’s a bad idea to bombard people with emails. The solution for you is drip emails. So let’s have a look at how to build a triggered email sequence with the Snov.io Email Drip Campaigns tool.
What is Snov.io Email Drip Campaigns
Snov.io Email Drip Campaigns is an exciting tool to send customized and automated emails. It is a simple drag-and-drop email campaign editor that offers real-time statistics of the campaign and so many other incredible functions. With Snov.io Email Drip Campaigns, you have control of the workflow, and the campaigns will be more productive. Highlighted below are the features of Snov.io Email Drip Campaigns:
- Custom email sequences: with Snov.io Email Drip Campaigns, you can set emails to be sent in particular order or when a certain action is performed by a user.
- Timers, triggers, and delays:io Email Drip Campaigns allow configuring a specific time to send emails automatically.
- Visual real-time statistics: it is possible to observe real-time statistics of the email campaign. They are presented using graphs and charts to enhance comprehension including email opens, link clicks, and replies.
How to start using Snov.io Email Drip Campaigns
Setting up the first email drip campaigns with Snov.io is quite easy, and in this article, we are going to examine how to import emails into a list, add an email signature, build a new campaign, and set basic drip campaign settings.
How to import emails into Snov.io email lists
- Open the web browser and visit the Snov.io ho Log in with your Snov.io username and password or register an account if you do not have one.
- The existing email lists are displayed on the left side of the web page; you can select any of the current lists by clicking them or create a new list with the Add list
- The content of the list is displayed once you have selected or created a new list. The secondary menu is displayed above the contents of the list. Click the Import from file button.
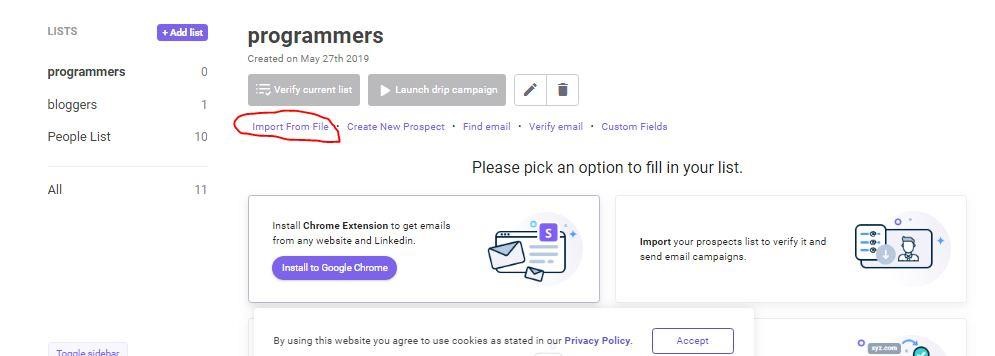
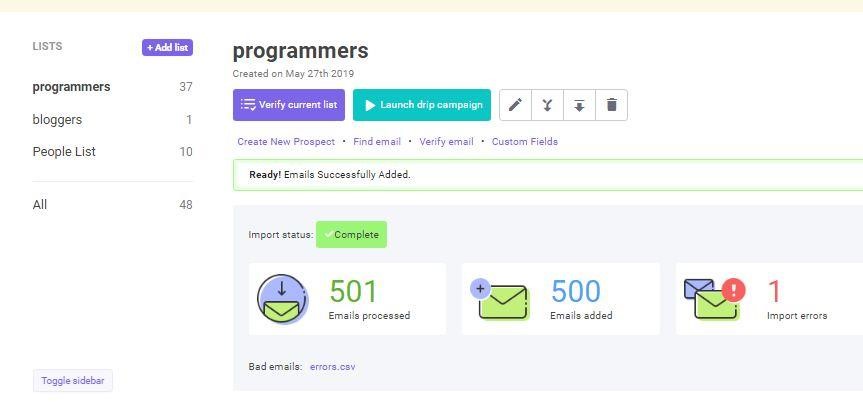
- When you import a file, you need to select fields to import it with the email fields, and then proceed to import the emails. Wait for the importation to complete.
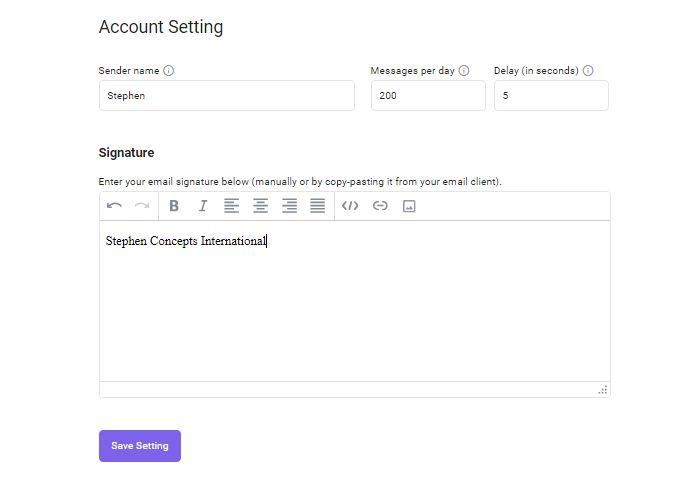
How to add an email signature
An email signature is signing your emails digitally, it appears at the end of every email sent from your Snov.io account and here is how to set it up.
- Click the user menu located in the upper-right corner of the page, and click The Account.
- You need to add a valid email account from which the email will be sent; this email will appear as sender on every sent email.
- Click the Edit button next to the email account you’ve recently added. Set the sender’s name that will be displayed in the Inbox and compose an email signature. You can either compose a text-signature manually or copy and paste an HTML one. Once everything is composed and ready-to-use, click the Save settings
How to create a new email campaign
- Click the Email Drip Campaigns button in the top menu.
- Click the New drip campaign Note: if you click the dropdown menu button on the right, you can create an email drip campaign from a template.
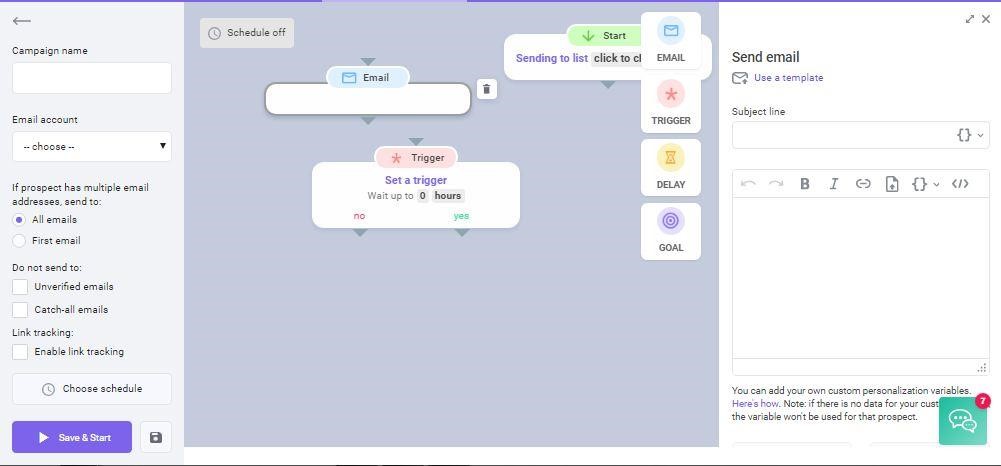
- You are transferred to the campaign builder page. First of all, define the main settings: the campaign name, an email account to use as the sender, option for multiple emails, option for unverified or uncertain emails, option for email tracking, and schedule.
- Build the sequence with the drag and drop elements. Add triggers, delays, goals. Click the Save and start button when you finish the campaign creation. We’ll talk about this step in detail a bit later.
Basic drip campaign settings
- Multiple Emails: sometimes, multiple emails are attributed to a single person in an email list; this option allows you to select whether to send emails to all the addresses or to the first email only.
- Unverified or Catch-all emails: this option allows you to select whether to send emails to unverified emails or not.
- Schedule: this option allows you to define the time when the emails are to be
Drip campaign design elements
- Email: email is the main element of a drip campaign. It allows you to set the email subject line, the content of the email, personalize both of them, and add attachments and links.
- Trigger: trigger defines the next step in the campaign once the recipient performs the specified action over the email.
- Delay: with this element, you can set delays between emails and triggers.
- Goal: this is the aim of starting the campaign; this will show you how close you are to your goals.
Get benefited
Snov.io Email Drip Campaigns tool is really easy-to-use, user-friendly, intuitive, and gives lots of benefits. The main one is automation. You have to build an email sequence with smart triggers and schedules, them, everything is performed without your participation. How great is that?
As soon as you try it, you will refuse to send emails manually. Once you see the results of drip emails, you will have no desire to send bulk emails anymore.