- VULCANIZED SPLICES
Although making a vulcanized splice requires more time, skill and expense, especially professional steps, it is far superior to a mechanical splice in many regards. Compared to a mechanical splice, a vulcanized splice:
- Is up to twice as efficient, and often lasts longer than mechanical splices. So we usually say make one time can use as long as the conveyor belt life, sometimes even longer than conveyor belt life.
- Running more smoothly and quietly over pulleys and idlers, with far less abrasion, damage, and noise. Because after finish the splicing, the joint part is same as the original conveyor belt. Even cannot easily find it after conveyor start running.
- Has better resistance to localized strain caused by transportation materials or conveyor maintenance part influence.
- Has better resistance to abrasion.
- Resists harmful moisture and chemicals better.
- Resists direct heat better, inasmuch as metal fasteners conduct heat to the carcass – to weaken fabric.
Use only the best grade of splicing compounds
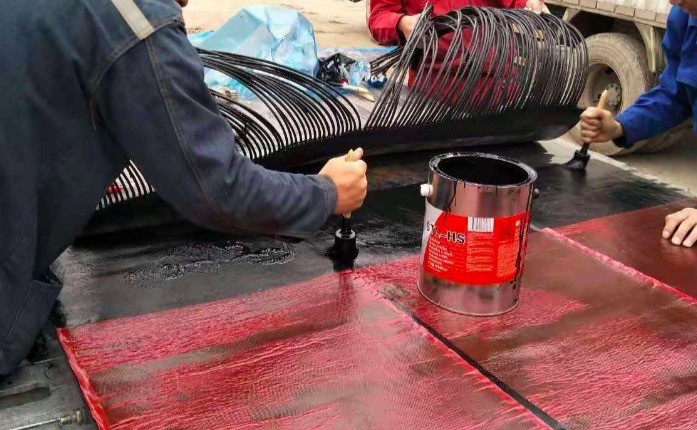
- VULCANIZED SPLICING PROCEDURE
Craftsmanship and maintenance are the most important elements in a vulcanized splice. In cutting the steps, for example, the fabric ot steel cord of conveyor belt core should not be cut in the whole pre-treatment steps.
Splice step lengths should never be shortened. And the fill-in fabric beneath the cover should likewise never be short-cut. Any type of short-cutting will seriously reduce splice life and strength. Use only the best grades of splicing compounds, compatible with the grades of splicing materials for the belt you are splicing. Do not use outdated materials, if the materials outdate, better choose the brand like RAMIMTECH, BAI-OTT, Nilos, Rema tiptop, Bando, ASGCO and so on large brand to prevent the belt joint fail after your complicated operations for a long time in the difficult working environment. And do not skimp on material, use strictly as the joint lap grade. A proper buildup is essential for an effective cure.
Proper tools and equipment are also vital for well-executed splices. A set of professional splicing tools set is the only type of tool that should be used for separating plies. Never use a screwdriver or a knife. When using a hot vulcanizing method, make sure you have properly cooled your splice to 70°C before opening the press. This will minimize the possibility of cover or ply separation and blisters. The splice should be allowed to cool completely before being put under tension. If have special things, must be remember ask the professional person help to resolve or ask your suppliers of the machine, the materials , the belt and so on.
- CHECKLIST FOR MAXIMUM SPLICE service LIFE
- See that skirting, plows and belt wipers touch splices lightly, if at all.
- Because of their higher efficiency and safety factors, use vulcanized splices in preference to mechanical fasteners wherever possible.
- Check splices regularly. Early detection of potential failure can save costly repairs and downtime later on. Conditions listed in the Problem Solving section of this manual will help you to spot incipient trouble.
- When properly executed without accidental damage, a splice can be expected to last through its design life.
- To minimize the numbers of splices joint, order the longest possible roll lengths. This will keep splices and their problems minimum.
- BEFORE YOU START TRAINING:
Square up and level the conveyor belt system. Be sure pulleys and idlers are square to the belt path. You may have to move some idlers forward or backward in their mountings to confirm other aspects no any problem. If idlers are being mounted for the first time, lightly tighten bolts for the training for easy adjustment. Tighten when training is complete.
- YOUR PRE-TRAINING CHECKLIST:
Be sure to make these checks before belt running startup:
- Has all splicing equipment such as vulcanizing press, splicing tools, workers been removed from anywhere of the conveyor frame and belt?
- Are pulley shafts and conveyor idlers parallel to each other?
- Were belt conveyor machine structure bolts checked for tightness?
- Are belt idlers horizontal, in-line and square with conveyor centerline?
- Have self-training idlers been installed properly?
- Were belt idlers greased properly?
- Is the reducer oil at the proper level?
- Was the belt chain guard oiled?
- Does the motor have proper rotation?
- Were all tools, installation gear and foreign objects removed from area? Was belt gravity takeup blocking removed?
- Have belt wipers and skirting rubber been properly adjusted?
- Are pulleys and idlers free of material buildup?
- Is the takeup carriage in good working order?
- Will head and tail conveyor pulleys be watched for possible belt runoff?
- Does the conveyor drum coated lagging sheet?
- ARE BELT EMERGENCY STOP CORDS INSTALLED?
- BELT inspection PROCEDURE:
Always inspect a belt without any transportation materials.
Shift only one idler at a time to prevent suddenly dangerous.
Pulleys should be kept square to belt running.
Running the belt at a very slowly speed for several revolutions while checking at head, drive, takeup, tail, and along carry and return runs for smooth passage. See the details and listen the voice whether have any abnormal conditions.
If everything is running smoothly, allow belt to run without materials transportation while continuing inspection steps–
- Start at head pulley and work toward tail on the return run.
- Begin training 4 to 6 idlers before maximum running.
- Follow directions of belt travel while making corrective shifts.
- Each idler shift should be very slight when running with the conveyor belt.
When return run inspection is completed, begin pay attention on the troughing side. Again, proceed in the direction of belt running and move idlers only slightly while making adjustments.
NOTE: It is especially important that the belt be set to pass under the load point on-center, under all operating conditions. Belt will not up to standard grade if it is loaded eccentric.
- THE BREAK-IN RUN
Begin by loading lightly, and increasing gradually to full capacity.
If necessary or have influence for the roller or conveyor belt cleaner or impact bed or other maintenance products, re-align idlers (see installation steps).
Be sure belt groove are loading belt on center.
Check to see that belt is still centered on tail pulley. Means the whole conveyor belt must be always running in the middle of the conveyors from head pulley to the tail pulley, including every large or small parts.
NOTE: Where materials are loaded off-center, the belt can be forced eccentric. Belt edges and conveyor parts can suffer severe damage if the deviation continues. Therefore, prevent deviation
Is also a important way to protect your conveyor belt.