For users of the Apple device, it’s a bit difficult to transfer data from iPhone to another iPhone selectively without erasing data.
Why?
Because iTunes or iCloud offers you the option to sync all data from iPhone to another iPhone using iTunes or iCloud, instead of selective data movement.
What’s worse, data on target iPhone will be replaced with the moved files.
It is a great pity, right?
Do not panic, and such third-party software as Aiseesoft Transfert iOS, can help you get rid of the trouble.
Aiseesoft Transfert iOS can help you easily transfer music, contacts, photos, videos, etc. from iPhone to iPhone, between iPhone and computer, even iPhone to iTunes directly.
Now, let’s breakdown the exact process.
What you need:
- A computer (Windows or Mac)
- Two iPhone devices
- Two USB cables, which allow you to connect both iPhones to the computer at the same time
- Aiseesoft Transfert iOS (You can download it here depending on your computer system)
Download on Windows: https://www.aiseesoft.fr/downloads/fonetrans.exe
Download on Mac: https://www.aiseesoft.fr/downloads/mac/mac-fonetrans.dmg
Steps to transfer iPhone to iPhone selectively and directly
Step 1. Connect two iPhones to the computer
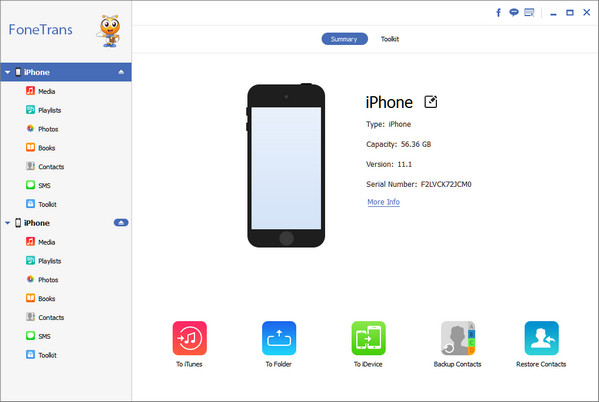
To transfer iPhone data to the other iPhone, download and install Aiseesoft Transfert iOS and start it on your computer. You will see the following interface.
![]()
Connect the source iPhone and the target iPhone to your computer with two USB cables and this iPhone transfer software will load information of your iPhone devices and display them in the main interface.
Step 2. Choose the data to transfer
Then if you want to transfer ringtone from an iPhone to another iPhone, just click on the “Media” in the left sidebar from your source iPhone, and then choose the “Ringtone” section, you will find all items on the right window. Select the ringtones and tick the corresponding boxes.
If you want to move all items from one iPhone to another iPhone, you can select all the music easily by checking the “Select All” box.
Step 3. Transfer data from an iPhone to another iPhone
After choosing the files you want to transfer, click on the “Export to” button and choose the name of the target iPhone. Afterwards, the transfer of data to the other iPhone will begin. The process will be completed in a few seconds. Wait a moment, and you can find the transferred data appear in target iPhone.